
Tools of trade: foundation- sneak peak what you will learn

It can make your skin appear flawless and natural,with healthy glow, might cover imperfections and blemishes, smooth out uneven skin tones.
The right one looks like you're wearing nothing but the wrong one looks like you're wearing a mask!
Wearing foundation correctly can do more for your appearance than practically any other make up product, can also be one of the most difficult to choose correctly.
Your skin is the most important part of your make up look so treat yourself to the best foundation you can afford, higher priced one usually contain higher quality pigments that last longer and appear much more flattering. They also usually contain higher quality moisturizers and oil absorbers, helping them perform better.
Nowadays is a lot of options when it comes to foundation formulations. Thanks to modern technology many can appear almost invisible! You can choose from variety of textures and formulas that will give you different coverages and finishes. Best is give illusion of having healthy, glowing, flawless skin but remember with the seasons and as you age you must change your foundation as well if you want to continue looking flawless and fresh!
So lets look on different types:
a) liquid foundation- this is most popular and is suited to most (if not all) skin types. It's available in every type of formula from oil-free, oil-absorbing for oily skin to moisturizing for dry skin.
Liquid gives varying degrees of sheer to medium coverage, depending on the brand and formula.
Most can be layered to create more coverage, can purchase in bottle or a tube.
b) liquid pigment- this is almost pure pigment, giving you great coverage without weight and texture. It can be used alone or added to the other products such as moisturizers, primers, tinted moisturizers, bb creams or other foundations. The more drops is use the more coverage will get!
c) creme foundations- smooth and creamy is specifically formulated for normal to very dry complexions. It's one of the most moisturizing formulas you can use! It gives skin a natural finish while offering one of the highest of all coverages but can be also versatile even though it tends to have a thicker and heavier consistency simply apply with damp sponge and will make it sheerer!
However if have flaky skin it can look cakey and the result can be slightly dull and heavy-looking.
d) mousse foundation- this is a creme foundation that has a whipped consistency, formulated for normal to dry skin. Comes in a jar rather than a compact and it is usually lighter and sheerer than its compact counterpart, evens out the skin tone without appearing heavy. Usually high in pigment and low in viscosity, it gives great coverage while appearing almost invisible on the skin, mousee-textured formulas seem to sink into the skin rather than sit on top of it make coverage look natural.
e) stick foundation- is essentially a neatly packaged creme foundation and concealer in one, best for normal to dry skin and is good option if looking for more coverage. Offers ideal maximum coverage for imperfections as well as covering ruddy and uneven skin tones. Gives quick coverage but it can look a little heavy on clear skin on which lot of coverage is not needed. The best is dot it where you need it and simply blend powder in and go!
f) creme to powder foundation- quick and simple, formulated for normal to slightly oily skin, it has creamy texture that dries to a powder finish, no additional dusting of powder is needed to set it. These formulas are kinder to oily skin because the powder helps cut down on excess shine. It is creme at heart so will give you more coverage but less than moisturizing creme (creme/stick) but more than a liquid or tinted moisturized.
g) bb, cc and dd creams- these are lightweight, low coverage versions of a foundation with lots of treatment. BB creams were design to brighten and lighten the skin while moisturizing and providing sunscreen. CC creams are light but better coverage and built in primer, brightener and anti-aging properties, some boast as many as twelve functions in one product. DD creams provide additional long-term anti-aging benefits with the increased coverage that we got added from our cc cream.
h) tinted moisturizer- these are with a little color added, formula works on normal to dry skin and gives you sheer, lightweight, breathable coverage with a fresh, nearly naked finish. Gives the sheerest coverage of all the foundation formulas and it's ideal for use during the summer months when you feel like wearing next to nothing, evens out skin tone and is the easiest to apply. Many contains sunscreen which means one less step in the morning.
Tools of trade: NEW COURSE

It's hard to know what to buy, where to invest or maybe save money!?
When go to a department store you'll be hit with an endless number of products that the salesperson just want to sell you! Many you don't need and probably never wear.
The best solution is to educate yourself so you can make your best choices no matter where you are!
In this course I will discuss which products will best meet all needs!
Enjoy!!!
Day vs Evening look

Although you make use of the same makeup items for day and evening makeup, the color and intensity of the look makes all the difference. Depending on the lighting, different makeup colors can lend a unique texture and tint to your skin, making it imperative for you to make the right choice.
• What constitutes Day Makeup?
Needless to say, day time is the brightest part of the day with ample sunlight adding a golden sparkle to all environments. During the day, it is best to stick to subtle and natural makeup. As the bright sunlight is already highlighting the features of your face, your makeup should do little in exaggerating the same features. Day makeup is most commonly worn to the workplace or when carrying out everyday tasks. Neutral shades best define day makeup as they enhance your features without overdoing the overall look.Neutral makeup helps define your facial features and you can use it to draw attention to specific parts by adding a bit of bold color. Day makeup is essentially balanced and subtle, bringing a light glow to your face.
Stick to browns and grays and add a light touch of blush and mascara to enhance your features. If you are planning on wearing eye makeup, a light touch of black eyeliner with a subtle lipstick or lip gloss completes your day look. It is important to stay away from using prominent makeup like thick eyeliners as natural sunlight and fluorescent lights can make your eyes look artificial and unnecessarily thick. While the choice of makeup is unique to your tastes, it is always a good idea to avoid exaggerating it or looking overdressed.
• What is Evening Makeup?
Unlike day time, evenings are comparatively dimmer, relying mainly on artificial lighting. Owing to the lack of bright light to enhance your features, you makeup needs to be a little more dramatic and glamorous. If you are attending a party at a dimly lit venue, bold makeup is the way to go. If you are waiting to try out a new brand or color of makeup, then is the best time to experiment. To master evening makeup, you should zero in on your best features and highlight them with bold colors. To shine the spotlight on your eyes, use more mascara and eyeliner. You can even use kohl to make your eyes appear sultry and seductive. If lips are your best feature, don’t be afraid to accentuate them with bold colors.Eyeshadows: SMOKEY EYE LOOK

Makeup experts essentially point out that you need a minimum of three eye shadow colors to create the perfect smoky eye look. These three eye shadow shades can be classified as a highlighter, a medium tone shade and lastly a contouring eye shadow shade. Generally speaking, the highlight color acts as a base and therefore is generally of flesh color, with perhaps a dash of shimmer. The medium tone color, on the other hand, should be a shade or two darker than the skin or highlighter shade and preferably of matte texture.
Start by applying the highlight color to the eyebrow bone till the duct of the eye. Next, you need to apply the medium tone color all the way from your lash line to the crease line of your eye and fuse it seamlessly with the highlighter already applied in the area. Let this application rest for a while. Begin by applying the contour color from the lash line, blending it in short strokes upwards towards the creases of your eyes so that it looks like the same shade of color is shifting from lighter to darker across your eye. Here, you should ideally use your index finger to gently smudge this contour color along your lower eyelashes as well.
To finish a smoky eye look, apply a dark colored black or brown eyeliner and mascara to present the illusion of well-spaced, long and combed lashes. Such a classic smoky eye effect works the best for women who have small, deep-set eyes and grey eyes, as it tends to define their eyes even further. However, there are a few pointers you must keep in mind when trying out the smoky eye look.
Always remember that the under eye area is highly sensitive and thin, and any kind of makeup application in this area needs to be done with a soft hand and an even softer brush. Never rub in any makeup in this area, always glide it on or dust it on using a good quality eye makeup brush.
Since the under eye area is gentle and thin, it simply cannot take any kind of cakey makeup or too many layers of it. For example, too much eye shadow or hurried layering application of eye shadow in this area is bound to cause your eye shadow to flake or crease, leaving you with a very unflattering look. The best way to avoid something like this happening is to apply makeup in this area softly with feather like strokes.
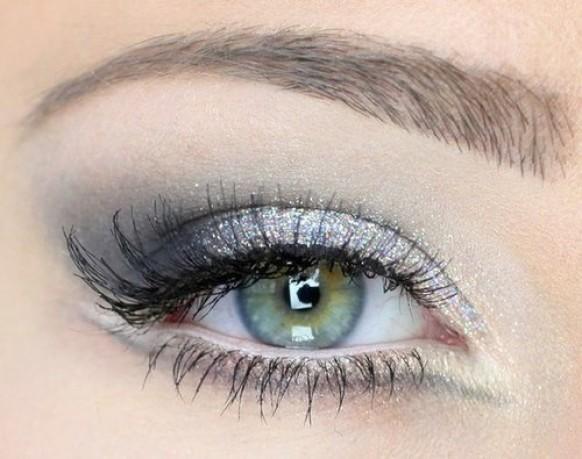
Eyeshadows: GREY EYES

Since grey is often considered a neutral color, almost all color palettes go well with it. However, when it comes to doing eye makeup for grey eyes, there are certain shades that flatter them more than the rest. Makeup experts generally swear by the grey on grey look for such kind of eyes and advise that the best way to give your grey eyes the attention is to use eye shadows in shades of deep brown, black and deep grey.
The inherent darkness of such dark shades works to draw out the white portion in grey eyes, making the eyes appear big and bright. Metallic colors like coppers and bronzes too look lovely on a pair of grey eyes, and so do contrasting colors such as ivory, white and purple. While attempting to do up your grey eyes, ensure that the chosen color palette also compliments both your skin tone and hair color. This is because irrespective of which facial feature you are highlighting, ultimately the makeup you use should come together and go well with your personality and clothing style.
A smoky eye look is very easy to achieve and looks particularly flattering on grey eyes. The biggest misconception about such a classic look is that it generally involves using dark and darker shades of a certain color. However, this is only partly true because the key to achieving a great and flattering smoky eyed look lies in seamless and thoughtful layering of complimentary shades of eye shadow, light or dark.
Eyeshadows: BLUE EYES

Some eye shadow shades play up your blue irises while others draw attention to them in a more subtle way. You should determine the eye shadow palette by keeping in mind the look you want to achieve. Consider your skin tone and hair color as well when picking out the right eye shadow.
Some unusual shades of eye shadow are very flattering for blue eyed women. These include orange based shades that really make your eyes pop. Avoid bright/neon shades if you want to stay away from a bad look. A number of metallic shades work well with blue eyes such as copper, brown, rust, gold, peach, chocolate, bronze and rust. Shades of purple and plum together with grey or light lavender work really well for evening makeup.
If you want a ‘cool’ look to match your evening gown, then choose pale pinks or pale blues (not the same shade as the irises). To highlight the color of irises and make them seem darker, pick up deep midnight, purple or violet eye shadow.
Greyish- blue irises are best highlighted with a brown eye shadow palette. The medium brown goes at the crease of the eye while a lighter shade is applied over the lid. You can use brown eyeliner or even a black one over your lower lid to define your eyes. Brown is a natural tone that enhances the blue of your eyes without creating an overly made-up look. This is an excellent shade for both morning and evening makeup. Grey-blue eyes also look stunning when you add a line with a matching grey blue eye liner.
Greenish-blue eyes are best brought out by grey, purple or violet eye shadow fading into taupe towards the crease of the eye. For a stunning smoky eye look, deep blue and grey is the perfect choice.
A black eye liner adds some spice to any of these shades and gives your greenish blue eyes a highlighted effect. But it could easily turn overly dark, so take care. Turquoise and teal shades that look overly bright on other blue eyes shades work very well with greenish-blue eyed beauties. These bring out the green shade in the irises and make for a stunning look.
A great evening look is a gold shimmer shadow or a silver shadow mixed with dark grey or black. For a natural or nude look, taupe and champagne are a good choice for blue eyes of any shade. Tan or brown is also a good natural shade.
Aqua/turquoise eyes are best accentuated by brown shades. While black is avoidable, dark brown is a good choice for aqua eyes. This eye shade is one of the few that looks good with both silver and gold shimmer/tone.
Start your eye makeup with the application of a primer. This absorbs the oils from the eyelids so that the color applied is true and it stays on for a long time. Pick up a light neutral base for the main color shadow you want to use and a darker hue for shading. To highlight, you can also pick up a lighter shade than the main color. Apply the highlighter all over the eye area first, if you are using a light shade for this purpose. The darker shade is applied on the eyelids and taken up to the crease. The liner goes right above the lash line in a thin line. On the lower lid, apply the line starting halfway along the eye moving toward the outer corner.
Eyeshadows: BROWN EYES

Brown eyes are very versatile and they look great with nearly every shade of eye shadow. However some shades make them look particularly glamorous. If you like metallics, then you can pick up a copper, gold or bronze shade to give your eyes a mesmerizing look while highlighting the deep richness of your brown irises. Browns are also great choices and they add to the depth of your brown eyes, drawing attention to them instantly. Do remember that if you use brown, then the color of the eye shadow should be a bit lighter than your dark brown eye color and vica versa. If you have light brown eyes then you can use a darker brown eye shadow. This will make your eyes stand out even more. Pinks help the brown eyes stand out without appearing flashy.
If you are opting for an understated look, then neutral color choices are a good option. Among these, pick up brown, peach or taupe to subtly highlight the eyes without making the eye makeup very evident. These eye shadow shades are perfect when you are getting ready for a business meeting where you do not want your makeup to be very obvious. To go a step further and opt for the dramatic look, select blue, brown, gold, vanilla, gray, black, violet, nutmeg or purple. Pick the deeper hues of these colors to outline your brown eyes perfectly.
One of the biggest advantages of having brown eyes is that you can pull off the dramatic look just as well as you can carry away the subtle one. This makes it incredibly easy for brown eyed beauties to match their eye makeup to their outfit or mood. A smoky eye also looks very nice with brown eyes.
Apply a highlighting color over the entire eye area. Sweep the chosen eye shadow either on the eyelid or in the crease of the eye. Use a darker shadow to line the eyes to make them look bigger. Otherwise, you can simply use an eyeliner pencil to draw a fine line close to the lash lines. If an eyeliner pencil is your choice, then pick up golden browns, bronze, deep blue, dark gray or different shades of brown. Charcoal black liner applied slightly thicker than usual makes your brown irises appear lighter and translucent. Metallics and lighter shades make your eye color richer and deeper.
Use primer, foundation and powder before you do your eyelid makeup to ensure that the color stays on all day. The biggest problem with eye makeup is smudging and the primer ensures that this does not happen. Pat the primer gently onto the eyelids before you apply the base color.
White eyeliner applied to the waterline makes your eye appear more open and bigger as well. Pay attention to your brows as they serve to highlight your brown eyes and your eye makeup perfectly. A dot of shimmer to the inner corner of your eyes makes your beautiful brown eyes really pop!
Eyeshadows: GREEN EYES
Not all eye shadow colors go along with green eyes. Shades of violet and lavender, mixed with reddish or pink hues suit women with green eyes the best. This is because these shades in particular help bring out the natural yellow, golden tint in green eyes. Another way to feature such eyes is to use purple eye shadow, layered with shades of brown or bronze. This color combination draws attention to the bluish tinge in green eyes. Eye shadow colors do not stop there- you can also use gold, peach, deep green, copper, medium pink and apricot. Eyeliners in brown, golden brown, deep purple, steel grey or black make your eyes stand out even more.
Apart from this, your eye shadow should also match your skin tone. Experts suggest experimenting with dramatic colors such as amber, neon shades and jade, but to stay away from yellow hues, such as lemon and mustard, as these make your green eyes appear dull. Another thumb rule is to never exactly match your eye color with your eye shadow. Instead, contrasting these colors is the best.
For example, a light green eye shadow would not look very good on a green pair of eyes, but a turquoise blue one would look very attractive. Shades of silver and grey also make green eyes stand out, but you need to be careful while using these as there is always the danger that your eyes may end up looking too cold.
A smoky look goes well with green eyes, and so does brown eye shadow. However, while applying such shades of eye shadow, be cautious because if your eyes are more hazel than green, then a brown eye shadow would make your eyes look deep-set.
On the other hand, women with green eyes can never go wrong while applying shades of gold, copper and bronze. Remember, makeup for green eyes can never be restricted to any one color as it would either heavily contrast with the greenness of your eyes or make them look incredibly dull. The trick is to layer your eye makeup in such a way that your green eyes come across as striking.
Ensure that your eyebrows are plucked and well arched so that anybody looking at your face is captured by the well-defined green eyes staring back at them. If you have very thin eyebrows, then it is best to use a brow-pencil to fill them in. The idea here is that your eyebrows should frame your eyes in a flattering way, and also compliment them.
Second, while doing eye makeup always use a primer and base before applying eye shadow. This ensures that your eye makeup stays in place for longer and reflects well on your face. It is also a good idea to use eyeliner, mascara and an eyelash curler, as these cosmetics all work to bring out your green eyes. Also, keep a cotton bud handy to remove extra eye shadow.
Dusting a little waterproof translucent powder on your eyes helps ensure that your makeup stays in place no matter how hot or wet it gets. Since eyes are very sensitive, you need to ensure that all the cosmetics you use on this particular zone are of good quality and are dabbed lightly, rather than rubbed on.

How to contour forehead

Generally, women with heart shaped faces have wider temples and foreheads. If you are one of them, then to get an overall balanced look, you need to focus on the temple area of such a wide forehead, shading it well. This shading needs to be balanced by highlighting the center of your forehead and the bridge of your nose.
Such precise, corrective contouring helps to make your face optimally oval and proportionate in viewing. Similarly, for women with a round face who have a broad forehead, highlighting the center of their forehead is a good idea. Such women should also contour the sides and temples of their foreheads to give their face an overall slim look.
There are a few things need keep in mind while contouring your forehead:
Blending
It is generally thought that blending makeup is very easy and straightforward, given the relatively large area that the forehead covers. While this is true to a certain extent, attention still needs to be paid to detail. For example, if you have a long forehead, then you need to begin by dotting your foundation or contouring powder about half an inch under your hairline. The chosen contouring medium should always be a softer or bolder shade than the shade of your daily wear foundation.On the forehead, you can use either a brush or just your index finger to blend your contouring medium in a downward, sweeping motion. While applying such shading on your forehead, you must avoid straight strokes at all costs, as these serve to make the makeup very obvious and visible. Similarly, if you are struggling with a wide forehead you need to apply small amounts of your contouring powder or cream onto the sides of your forehead and along the temple. In such a case you need to brush your makeup towards the center of your forehead and in upward, subtle and light strokes to give your forehead a longer and thinner look.
Experiment with your hair
Another solution of dealing with a forehead that is too wide or narrow, is to experiment with different haircuts and hairstyles that work well to camouflage your forehead discrepancies. For example, experts generally suggest maintaining a fringe haircut, if you have a long forehead or to leave your forehead open (no fringe) should you want to camouflage a small forehead. However, should you have a wide forehead you should never comb your hair back, as that would make your forehead even more visible and obvious.Highlight other facial features
A way of drawing attention away from an unflattering natural forehead is to play up other flattering features of your face such as your eyes, cheekbones and your lips. For example, to take away focus from a very narrow and small forehead you can always use stunning eye makeup, give your lips a glossy makeover or even better flaunt well defined, chiseled, rosy colored cheekbones.Define your eyebrows
Another way to draw attention from a problematic forehead is to ensure that you always have eyebrows that are well plucked and defined. Such chiseled eyebrows work to provide a visual break between the eyes and the hairline. Even to such an extent that people looking at you often tend not to notice your forehead or its shape. Team these eyebrows with well blended and colored eye shadow on the upper eyelids and no one is bound to notice your tiny or broad forehead.Use powder to set
As with all makeup, always dust some translucent powder onto your whole face especially your forehead as this ensures that your attempt at shading and highlighting stays in place and doesn’t smudge every time you touch it or reach for your hair. The best way to apply such powder is to use a clean face puff or natural hair powder brush.Camouflage with fun accessories
If all else fails, you can always depend on numerous fashionable cool accessories to combat your forehead size. In some cases, you can choose funky cool summer hats that serve to cover a wide forehead or you could try tying colorful scarves around your forehead. You can also use or weave in artificial hair such as an attractive set of colorful curls that cascade down your forehead, hiding it.Cheekbones contouring

Corrective contouring emerges as a viable and practical solution to get the perfect cheekbones that you need as opposed to corrective surgery and cheek implants. Put simply, corrective contouring is a kind of advanced makeup that works to highlight and bring forward the defining areas on your face, especially your cheekbones, while shadowing other areas that are unflattering. Such kind of contouring offers your face a flattering new shape and dimension.
Shades of brown powder work the best on most cheeks, especially the ones with grey undertones. Once you have chosen your shade of powder, you need to use a good quality angle powder brush and sweep it across your color palette. Next, angle your brush in such a way that it brushes against the highest part of your cheek where your finger was earlier positioned.
Keeping in mind the 45° angle you had made earlier, firstly move the brush upwards in a straight line. Ensure that the brush movements are smooth and the color simply glides on your cheeks. Continue doing this till you reach the area at the end of your eyebrow. Take the same brush and make circular movements over the line that you have drawn. This technique ensures that the darkest shade of the color is near your eyes and then gets lighter as you move downwards.
However, if you think that the color has become too dark, dust some translucent powder on it to lighten it. Another quick way to do this is to take your foundation sponge and gently “sweep” over the dark area. Remember to factor in the time of day when you are stepping out. This is crucial because day time contouring needs to be more subtle and detailed, as the natural light is bound to reflect off it. On the contrary, contouring your cheekbones for a night event is easier as dull and dim light always flatters contoured cheeks.
For most women, cheek contouring means sucking in your cheeks and applying a darker shade of the contouring powder to the hollows of your cheeks, and a highlighter on the top of the cheekbones. They dust some blush or powder on it to ensure their makeup stays in place. While there is nothing wrong in contouring cheeks this way, you must know that there are different kinds of cheekbones, and each kind requires a different corrective contouring technique.
People with round faces are generally known to have full (not always visible) cheeks, which lend them an air of looking younger for longer. A truly round face is known to have a rounded chin and a short fairly wide forehead. To make such a face appear slightly oval, you must draw attention and highlight your forehead and the area underneath your eyes that sits just on top of your cheekbones. This helps draw attention to the center of your face. Here, you can use shading on your cheeks and jaw line by using a bronze shade powder or cream foundation, which is likely to suit your skin tone.
Jaw line contouring

The best way forward is to make the best possible use of the jaw line you are gifted with and camouflage it to look your best. Corrective contouring is a method/technique of applying advanced makeup which essentially uses shadow play and shading to create the desired effect on the face.
Corrective contouring although simple, is tricky, more so during the day as direct light on the face can easily betray your secret. To ensure your attempt at corrective contouring goes undetected, here are a few tried and tested tricks and tips that promise you the best possible contouring for the jaw line.
-Get rid of your side fuzz – To begin with; remove your side burns or your facial fuzz. You can do this at home or in a parlor since easy to use creams and waxing strips are now available especially for this purpose. This exercise helps in two ways; it works to highlight both your cheekbones and your jaw line. Removing your facial hair will lend your cheeks a kind of a hollow look, exposing the lovely L shape of your side face and pushing out your jaw line. After doing this you will be sure to easily identify your jaw line and contour it accordingly.
-Blend, don’t mix – While anyone can apply basic makeup, not everyone can blend it well. It is this, the process of seamlessly blending different shades of foundation, blushes and highlighters, which is responsible for the success of any corrective contouring attempt. You need to practice shadow play and shading your jaw line as often as you can, because an unblended jaw line stands out like a sore thumb, garnering you unwarranted attention and comments.
-Don’t ignore the neckline – When we talk about shading the jaw line, it doesn’t simply mean the line along its jaw. Corrective contouring focuses on providing a well camouflaged, seamless look so no matter what color highlighter/foundation/blush is used, always make sure that it is blended in. When doing contouring around the jaw line, it should not stop there- the color should also be applied in the under ear area, under the chin and blended into the neck line. If this is not done then your face would end up with an unflattering line showing everyone that you tried your hand at corrective makeup.
-Keep that hair away – Always tie your hair before you start the process of corrective contouring on your jaw. Your hair may impede on your vision of the actual length and shape of your jaw line. Even if you have completed your face makeup, always tie your hair or push it back from your neck area, to get the best view of your jaw line. This also ensures you have unrestricted access to your whole jaw line and that your hand can glide smoothly across it.
How to contour different nose shapes

Large, prominent nose: Such a nose simply stands out on the face and becomes its defining feature.
Wide nose: This nose normally has a very wide bridge.
Snub nose (tip-tilted): This kind of a nose is short and flat, sloping upwards at the tip.
Thin short nose: While this kind of a nose looks similar to a snub nose, the nostrils are more defined and stand out.
Long nose: Such noses tend to appear long and pinched, especially when viewed from the side.
Hawk nose: This nose is normally long with a very prominent bridge and down turned angle tip.
Nose contouring is best suited for night occasions and parties, as the generally dim and soft lights work well to support the nasal illusion you have worked hard to create. However, nose contouring during the day requires detailed care, as daylight is usually harsh and unforgiving to makeup.
• Blend well – Makeup on the nose and around it needs to be blended very well. This is crucial as natural light is prone to expose your attempts at corrective contouring should your highlighter or shader not be well blended with your overall face foundation. In such cases, your nasal flaws may become even more obvious.
• Don’t limit yourself to the nose alone – When we talk about nose contouring, it is good to remember that whatever makeup you use on the nose, you needs to start from the inner corners of the eyebrows and extend it till the end sides of the nostrils, as this whole area comprises the nose for makeup purposes. If you are using two shades of foundation in this area, then both need to be blended seamlessly or else their application lines will be visible.
• Stay shine-free – Another common problem that makes most nasal flaws obvious is a shiny nose, as it immediately draws undue attention to itself. The only solution to this is to ensure that you stay shine free. For this, you must never moisturize your nose before applying makeup, as it obviously tends to make you sweat. Another solution to the problem of a shiny nose is to frequently powder your nose as loose powder is known to absorb all the excess oil. Also, when you buy foundation, highlighter and a dark powder for shading, ensure that you buy their matte counterparts and not the glossy or shiny versions, as they could prove counterproductive to you.
• Use translucent powder – Irrespective of the shape of your natural nose and the corrective contouring you do on it, remember to always dust some powder on it once finished. This is because good quality, well matched transparent powder is known to hold the makeup in place and set it in a way that it stays the same for a long time.
Draw attention to your eyes or lips – Another good idea to ensure that no one catches your nasal contouring is to draw attention to some other part of your face, such as your lips or your eyes. Highlight one of them in flattering shades and hues and blend them well with the overall foundation on your face. This age old makeup trick works well because it is so simple and easy and ensures no one examines your attempts at nose contouring too closely. Broken or snub nose; feel free to experiment with smoky eyes, metallic eye shadows and hot lip colors that draw attention above and below your nose.
Face shapes

1. Round Face
You have a round face when the vertical to horizontal ratio is equal. The majority of your features are soft and rounded. You also probably have a round chin. Your cheeks are the widest part of your face, which gives it that rounded shape.Celebrities With Round Face:
- Ginnifer Goodwin
- Mila Kunis
- Emma Stone
Makeup Tips For A Round Face
- Arched Eyebrows: When you have a round face, it’s always better to add lines and definition to your makeup look. The first thing you should do is have well-defined brows. Do not keep the eyebrows rounded as this will make your face look even longer. Go for an angled arch while shaping and filling in your brows.
- Contour: Contour those cheeks! When you have a round face, your cheeks are probably the widest part of your face and if you want to give your face some depth, contouring can be your best friend.
- Blush: You may think that if you have sightly chubby cheeks, you shouldn’t use blush, but that is NOT the case. A shimmery blush will enhance your cheeks and give them a healthy glow.
Hairstyles For A Round-Shaped Face
- Tousled Pixie
- Asymmetrical Lob
2. Oval Face
An oval shape is a longer version of the round face. Your chin still stays rounded, but the length of your face is more than the width. Your forehead is probably the widest part of your face.Celebrities With Oval Face:
- Blake Lively
- Selma Hayek
- Julianne Moore
Makeup Tips For An Oval-Shaped Face
- Balance: Try and keep things balanced when it comes to your eyes and lips. This means that if you’re going for something heavy on your eyes, like the smokey, keep the lips simple and nude.
- Naturally Arched Brows: Follow the natural shape of your brow. Don’t try to make it anything too dramatic. At the same time, do not overpluck them! You want a clean eyebrow shape.
- Highlighter: A highlighter can help in bringing certain features forward. If you have an oval-shaped face, then you can use this along the bridge of your nose, your forehead, and at the top of your cheekbones.
Hairstyles For An Oval-Shaped Face
- Side Swept Pixie
- Tousled Bob
3. Square Face
Self-explanatory, people have a square-shaped face if they have comparatively straight sides with minimal curve at the chin. They also have angled jaws. The face is also proportional. This means that the vertical to horizontal proportion is nearly one to one.Celebrities With Square Face Shape:
- Cameron Diaz
- Lucy Liu
- Rihanna
Makeup Tips For A Square-Shaped Face
- Contour The Sharp Angles: When you have a square-shaped face, you probably have a wide jaw. Contouring really helps to soften the sharp angles that accompany a square-shaped face.
- Highlight: You can try the highlighting technique to enhance certain facial features. In the case of someone with a square face, use a concealer that is one shade lighter on your forehead and under the hollows of your cheeks. This creates a perfect balance when you contour the jawline.
- Dramatic Lips: You want to take the attention away from your jaws, and the best way to do that is by drawing the attention to the lips. Go bold! Go for a bright red, coral or purple, based on what you prefer.
Hairstyles For A Square-Shaped Face
- Side Swept Bangs
- Angled Bob
4. Rectangle (OR Oblong) Face Shape
This can also be known as an oblong face shape. The only difference between a rectangular face and an oblong face is that an oblong face is slightly less angled. It follows the same basic rectangular shape though. You have a rectangular face shape if your forehead, cheeks, and jawline are nearly the same width. The chin is only slightly curved.Celebrities With This Face Shape:
- Alexa Chung
- Meryl Streep
- Liv Tyler
Makeup Tips For A Rectangle-Shaped Face
- Soften The Angles: The tips for a rectangular face shape would be a combination of both an oval face and a square face. The trick is to soften the jaws and temples, so applying some bronzer and contouring, it would really help.
- Cat Eye: Since you have a long face, winging out your eyeliner helps the eyes look bigger and wider, and the attention is drawn to this area.
- Blush: While applying a blush, apply it to the tops of the cheeks instead of right in the middle.
Hairstyles For A Rectangle-Shaped Face
- Long Pixie
- Shoulder length hair with bangs
5. Diamond Shaped Face
Women with diamond-shaped faces will probably have high cheekbones and pointed chins. You might think that this could be a heart-shaped face as well, but not really. The main difference is that the forehead is narrower for someone with a diamond face.Celebrities With Diamond Shaped Face:
- Ashley Greene
- Jennifer Love Hewett
- Scarlet Johannson
Makeup Tips For A Diamond-Shaped Face
- Pouty Lips: Don’t be afraid to go all out on the lips. Use a bold color!
- Contour Sides: Since the width is the most at the sides near the cheeks for someone with a diamond-shaped face, contour this area for dimension.
- Highlight: Additionally, make sure to highlight the forehead, cupids bow, the chin and along the bridge of the nose.
Hairstyles For A Diamond-Shaped Face
- Long Layered Waves
- Chin Length Bob
6. Heart Shaped Face
The main characteristics of a heart-shaped face are a pointed chin and a wide forehead. It doesn’t really matter whether you have a widow’s peak or not. This face shape is also called an inverted triangle, because when you think about it, your forehead is the widest part of your face and the chin is pointed.Celebrities With Heart Shaped Face
- Reese Witherspoon
- Ashley Olsen
- Halle Berry
Makeup Tips For A Heart-Shaped Face
- Smokey Eyes: When you have a heart face, you probably have an angular jaw, so anything too sharp might be a little overpowering. Therefore, a soft smokey eye would be a perfect look for a heart-shaped face.
- Bronzer contouring: If there’s a theme to be followed with a heart-shaped face, it’s to go for a soft look. The same applies to contouring. Use a bronzer to contour, since women with heart-shaped faces already have some definition to their face.
- Max Volume Mascara: Another great look for heart-shaped faces is to add intensity to the eyelashes.
Hairstyles For A Heart-Shaped Face
- Lob With Bangs
- Long Way Layers

Wee trip along Scottish Union Canal

It has benefited from a general revival of interest in canals and, as a result of the Millennium Link, was re-opened in 2001 and reconnected to the Forth and Clyde Canal in 2002 by the Falkirk Wheel. It is now in popular use for leisure purposes.
How to apply false eyelashes

Long lashes frame your irises and make them stand out with stunning effect. You can achieve a picture perfect look by using false eyelashes. You can even create different looks, for example the sultry look with long curving eyelashes or the innocent look with thick short lashes and much more.
Applying false eye lashes for that perfect look requires a lot of patience and a steady hand. Of course, the results are better the more you practice. Before applying false eyelashes you should know how to make them appear as natural and as attractive as possible. Keep these facts in mind:
• False eyelashes appear natural only when the individual lashes are of varying lengths.
• The longest clusters should always be positioned at the outer corner of the eye.
• Always apply individual lashes, one at a time and check the effects before going on to the next. This will help you avoid the ‘obviously made-up’ look.
Before you apply false strip eye lashes, ensure that they are trimmed to fit your lash line length correctly. Apply a very small portion of glue to the strip lash. You can apply the glue to the back of your hand or a clean, disinfected hard surface and run the lash strip across it for an even spread of the glue.
Blow on the false lash for a few seconds to get the glue to start hardening. Applying the lash at this stage keeps it from shifting position once you have placed it the way you want. Position the lash exactly over your natural eyelash line (using a tweezer) to get a seamless full eyelash that looks and feels most natural. Use the backside of your tweezer and softly run it over the strip lash to make sure that it sits tightly.
Individual lashes need trimming so that they are not unnaturally long when compared with your own lashes. Use shorter lashes towards the inner corner of your eye and leave longer ones for the opposite end for the most spectacular effects. Make sure that the gap between the real lashes and the fake ones are even so that they look most natural. At the outer end you can position a cluster of lashes or a couple of clusters for that attractive sultry look.
The method for application of these lashes is the same as strip lashes except that you take each one at a time, apply the glue and position it where your natural lashes are sparse. Always start applying individual lashes from the outer corner of the eye and work your way inwards.
You may use an eyelash curler over your lashes both natural and false and then apply your mascara to complete the look. I recommend that you don’t use a lash curler when applying false lashes because the curler may shift the applied lashes and then you it will be difficult for the glue to set again.
Fill in eyebrows

Whether you use pencils or powders, keep in mind that they stick to skin far more than they do to hair. For making sparse eyebrows look fuller, fill in the areas where the hair should grow for a perfect eyebrow. Before you put pencil or powder to your brow, comb it out well and examine exactly where you need to work. Always apply the strokes in the direction of hair growth for a natural look.
Use brow powder to fill in your plucked eyebrows for a natural look. You get the greatest control over color placement when you use a stiff brush for the powder. If you have thin eyebrows or you have inadvertently over plucked, use a brow pencil for the filling. Finish the filling properly so that you avoid the penciled look. Never ‘draw’ the entire brow. This makes your eyebrows the most obvious features of your face but gives them an extremely artificial appearance.
To keep your eyebrows in place, use a gel if necessary. Tinted ones are ideal if you would like to add a color to your eyebrow. Blondes should go one or two shades darker than their hair color while brunettes can opt for the same color or a couple of shades lighter.
Before the perfect fill- in, brush the brow downward and then draw a line along the upper edge to mark where the arch should peak. Now comb up and out. Add volume to the sparse areas with a sharp brow pencil. Feathering strokes with your pencil give the best effect. The final natural look is achieved with brow powder. If you have colored your brows too dark, lighten the shades with a toothbrush dipped in shadow or neutral powder.
How to shape eyebrows

The golden ratio is a number that depicts the perfect proportion that is most pleasing to the human eye. Anastasia Soare, beauty ‘innovator’, was perhaps the first person to apply this number to the techniques of eyebrow shaping. Anastasia has created the perfect look for innumerable celebrities and has transformed asymmetrical and sparse eyebrows into the most stunningly attractive facial features.
Anastasia’s trademarked Golden ratio technique brings about balance in your face using the eyebrows as the starting point. You too can use this ratio to determine the shape that will set off your facial features in the best possible way. This is how to do it:
• A: Draw an imaginary line from the outside corner of your nose upwards towards the inside corner of your eye. Your eyebrow should end where it meets this line.
• B: Draw another imaginary line from the tip of your nose crossing the pupil of your eye diagonally. The point where this line cuts the eyebrow is the perfect position for the arch.
• C: Draw an imaginary line from the bottom of your nose to the outer corner of your eye and beyond. This is where your eyebrow should end.
Keep in mind the eyebrow should start directly above the eye’s inner corner.
The initial three quarters of your brow should gradually move upwards where your natural arch and peak there. The last quarter heads downwards, tapering off at the very end. You have an option of curving the line from the peak to the end or making it a straight line. Do note that either option makes for a very different look so you might want to experiment with them both for a while before you understand exactly how they look on you.
A few points to keep in mind when shaping your eyebrows:
• Tweeze your brows right after a shower or bath. Hair is pliable at this time and the pores are open and this makes it easy to pluck your brows painlessly.
• Over-tweezing should be avoided because it may result in ‘too thin’ eyebrows.
• Threading at home is best avoided because there is so little control over the shape you achieve. Threading is best done by a professional.
• Waxing is an effective way to get the eyebrow shape you desire although tweezing is a quick and easy solution for a light instant clean up. With waxing you should take care to see that you do not remove more of the brow that you intend to.
• When plucking your brows, limit yourself to the area between the brow and the brow bone. Tweezing above this line may result in an uneven shape.
• Plucking a few hairs farther from the innermost corner of your eye makes the eye look bigger.
Lashes and brows!

Long eyelashes are considered a sign of beauty in many cultures. Accordingly, some women seek to enhance their eyelash length artificially, using eyelash extension. On the other hand, Hadza women are known to trim their own eyelashes.
Kohl, a black putty (usually antimony sulfide or lead sulfide), has been worn as far back as the Brown Age to darken the edge of the eyelid (just at the bottom of the eyelashes). In Ancient Egypt, it was used as well by the wealthy and the royal to beautify their eyes. Modern eye makeup includes mascara, eyeliner, eye putty, and eye shadow to emphasize the eyes. The twentieth century saw the beginning of convincing false eyelashes, popular in the 1960s. There are also different tools that can be used on the lashes such as eyelash curler or mascara shield (also named mascara guard or eye makeup helper).
Permanent eyelash tints and eyelash extensions have also become popular procedures, even in fairly basic salons. It is also possible to get eyelash transplants, which are similar in nature to hair transplantation often done on the head. Since the hair is transplanted from the hair on the head, the new eyelashes will continue to grow like head hair and will need to be trimmed regularly.
Latisse was introduced in the first quarter of 2009 by Allergan as the first drug to receive FDA approval for eyelash growth. Latisse is a solution of bimatoprost, the active component of the glaucoma medication Lumigan. According to Allergan, noticeable eyelash growth occurs within 16 weeks. Growth is reported to occur primarily on the upper eyelashes. In addition, the past decade has seen the rapid increase in the development of eyelash conditioners. These conditioners are designed to increase the health and length of lashes. Many utilize seed extract, minerals, and other chemicals to achieve these results.
Cosmetic companies have recently relied on scientific research of prostaglandins and the Wnt/b-catenin signaling pathways to develop eyelash products. Although bimatoprost is effective in promoting increased growth of healthy eyelashes and adnexal hairs, its effectiveness in patients with eyelash alopecia areata is debatable.
The eyebrow is an area of thick, delicate hairs above the eye that follows the shape of the lower margin of the brow ridges of some mammals. Their main function is to prevent sweat, water, and other debris from falling down into the eye socket, but they are also important to human communication and facial expression. It is common for people to modify their eyebrows by means of hair removal and makeup.
Cosmetic methods have been developed to alter the look of one's eyebrows, whether the goal is to add or remove hair, change the color, or change the position of the eyebrow.
Eyebrow brushes, shaders, and pencils are often used to define the eyebrow or make it appear fuller. These can create an outline for the brows or mimic hairs where there are sparse areas. Brow gels are also used in creating a thicker brow; they allow for the hairs to be more textured, which gives the appearance of thicker, fuller brows. Lastly, brow powders or even eyeshadows are used for those who want a fuller and more natural look, by placing the brow powder or eyeshadow (closest to the natural hair colour) in areas where there is less hair.
A fairly recent trend in eyebrow modification is in eyebrow tinting: permanent dye, similar to hair colour, is used on the eyebrows, often to darken them.
Several options exist for removing hair to achieve a thinner or smaller eyebrow, or to "correct" a unibrow, including manual and electronic tweezing, waxing, and threading. The most common method is to use tweezers to thin out and shape the eyebrow. Waxing is becoming more popular. Lastly, there is threading eyebrows, where a cotton thread is rolled over hair to pull it out. Small scissors are sometimes used to trim the eyebrows, either with another method of hair removal or alone. All of these methods can be painful for some seconds or minutes due to the sensitivity of the area around the eye but, often, this pain decreases over time as the individual becomes used to it. In time, hair that has been plucked will stop growing back. Some people wax or shave off their eyebrows and leave them bare, stencil or draw them in with eye liner, or tatto them on. In Western societies, it has become more common for men to pluck part of their eyebrows.
To create a fuller look, eyebrows can be cloned in an eyebrow transplant. Individual strands of the eyebrow are created to mimic a natural-looking eyebrow of the desired shape. The process of eyebrow transplant is quite similar to the process of hair transplant. In this process as well, follicles from an active area are transferred to the area where there are no hairs. Follicles are mostly taken from the back of the head because it is the best harvesting site when it comes to hairs. The follicles are then injected into the skin.
The healing process after an eyebrow transplant is similar to the process of tattoo. In this process, patients may experience light bruising and crusting of the skin. People who have genetically thin eyebrows or who have over-tweezed are considered ideal for the transplant.
An eyebrow lift is a cosmetic surgery to raise the eyebrow, usually to create a more feminine or youthful appearance. It is not a new phenomenon, with the earliest description of brow lifting published in medical literature in 1919 by French surgeon Dr Raymond Passot. Brows can be affected during a face lift or an eye lift. In the seventies, doctors started injecting patients' eyebrows with botox or similar toxins to temporarily paralyse the muscles to raise the eyebrow.
From the 8th century, many Japanese noblewomen practiced hikimayu, shaving or plucking the eyebrow hair and painting smudge-like ones higher on the forehead. Shaving lines in eyebrows is another cosmetic alteration, more common among younger people in the 1990s and 2000s.
A new trend is eyebrow tattoos. This is seen as a way to achieve and maintain an eyebrow shape, achieved by using a coil machine, rotary machine and linear machine. This process, also called cosmetic tattooing, microblading, or blade & shade brows, involves an eyebrow artist making small, precise cuts that mimic the look of hair. Several celebrities have undergone the procedure, including Lorde, Lena Dunham, Adele, and Bella Thorne.
Material via Wikipedia
Keratin blowdry

Facts:
The Brazilian Blow Dry takes between 2 to 4 hours, depending on length, hair condition, and hair thickness.
It is NOT meant to be permanent and it DOES require redoing approximately every 2 to 4 months, depending on the individual’s hair type and preferences.
Regular treatment helps to blend treated hair with the natural growth of hair.
It does NOT use strong chemicals to open and close the hair cuticle in an effort to straighten it. Keratin is a natural substance which comprises 88% of your hair. It penetrates the hair repairing internal damage and coats the hair preventing further damage.
The results are soft, shiny, straighter hair.The Brazilian Blow Dry is excellent on all types of chemically treated hair (bleached, hi-lights, colored, permed, relaxed or previously straightened). It is excellent for getting rid of curly, frizzy, damaged, unhealthy, dull, mistreated hair.Although often referred to as a straightening treatment, the Brazilian Blow Dry is extremely versatile. For those who want to keep or enhance their luscious curls, the Brazilian Blow Dry can work to your requirements whilst still repairing any damage and unwanted frizz
Salon nearby who do it this treatment: MAD CUT Gorgie road 218, 07713948268
Fire hair treatments

A firecut is an interesting and truly extraordinary procedure which despite its name does not mean an actual haircut as one might imagine. It rather involves a special treatment without changing either length or shape of the hair.
The term “Firecut Hair Treatment” has numerous synonyms. In hair salons you may see it also being called VELATERAPIA HAIR TREATMENT, FIRE HAIR TREATMENT. But the essence of the procedure is always the same – giving the hair a healthy look and restoring its structure by using the fire to burn split ends and seal the cuticles.Firecut is mostly popular among women with long hair. The thing is that hair nourishment starts from the roots and becomes reduced at the tips causing dry and fragile hair with split ends, and a wisp-like look. Firecut Hair Treatment is aimed at fixing these problems:
-Such haircut can help bring dull hair alive and make it healthy.
-Split ends get sealed, give a neat look and become a non-issue for a very long period of time.
-Wisp-like hair which was negatively affected by numerous thermal influences, perms, dying etc. in no time transforms into beautiful shining hair.
-The most important thing is that firecut does not only give hair a healthy strong appearance, but it really does treat the hair from inside
Salons which do those kind treatments:
CAPRICE HAIR SALON
3A – 5000 Dufferin St.,Toronto, ON M3H 5T5,
Canada
416-661-6327
Tuesday – Friday from 10.00 to 19.00Saturday from 10.00 to 17.00
MAGDALENA DYLIK HAIR DESIGN
50 Easter Road
EH7 5RQ Edinburgh, United Kingdom
07443 066428
Open 9am-9pm most days
Hair treatments

Using a hair treatment is a wise idea if you want something more from your haircare routine. But with a huge array of products to choose from, shopping can be a confusing experience.
Masks, serums, oils, and glosses: understanding the differences and what hair concern they're best for is a great way to decide on a treatment product.
Incorporating regular treatments is a great way to ensure healthy and nourished hair. Have a browse to find the best ones for you and your hair.
Using a good shampoo and conditioner is a great way to ensure healthy hair, but sometimes your hair needs that extra kick to maximise hydration and prevent damage. The world of hair treatments can be a little daunting, so we're giving you a run-down on our favourite serums, hair masks, hot oils, split-end treatments, and everything else you'd ever need for healthy hair!
Hair treatments generally work in one of two ways. Either they coat the hair to strengthen and protect the hair cuticles, or they penetrate the cuticle to provide nourishment and hydration. Hair treatments have higher concentrations of nutrients than your shampoo and conditioner, so whilst your washes are a good starting step, treatments will up all the benefits for maximum results.
Out of all the treatments available, hair serums are generally the most versatile, as they can either coat the hair or penetrate the cuticle, or even do both! They have many functions too and can be enjoyed by all hair types. Do you know the difference between a smoothing serum and a repairing serum? A quick lesson on the differences ensures that you're always using your products in the right way for maximum benefits.
Some serums work really well at fighting frizz, but they aren't the only treatment available to ensure your hair stays smooth. Understanding what causes your frizz is the most important first step in banishing it. Once you've got your diagnosis, you can begin to switch your haircare routine.
Every hair-grooming routine starts with shampoo and conditioner, and getting this step right is particularly important in the battle against frizz. Then it's time for some treatments in the form of your blow-drying aid, and a serum or oil to finish.
Again, if you suffer from split ends, repair serums can really help prevent further damage between cuts. A simple change in how you look after your hair, such as not over-brushing, can make a world of difference when it comes to protecting ends. However, there isn't one single cause for splits, and you need to know what's causing them to fix them!
Hair masks mostly work as deep-conditioning treatments and penetrate the cuticle for maximum moisture. However, masks can do many other things, such as thicken hair, protect against heat, and repair damage.
Although conditioner will keep your hair hydrated, hair masks are much more powerful, and the benefits of the latter can be enjoyed by all hair types. As with every haircare product, a hair mask should be tailored to your haircare concern.
Masks are particularly beneficial for those with coloured hair. Masks not only provide the much-needed moisture to repair damaged hair after colouring, but they can also help preserve hair colour so it stays bright and vivid.
If you have rebonded hair, it's important to rehydrate your hair with masks after this chemical process. Rebonding can be very damaging. It's important to adjust your haircare routine to make sure your mane stays healthy. Masks can help to add moisture, protect rebonded hair, and keep tresses looking sleek and glossy.
There's much debate over how long you should leave your hair mask in. Some experts suggest that leaving a mask in overnight is the best way to maximise the benefits, whereas others claim that's actually damaging to the hair.
Another way to hydrate your hair is by using a hot oil treatment. Hot oil helps moisturise the hair, but the specific oil you use depends on your hair type and concerns. Those with oily hair might grimace at the thought of a hot oil treatment, but a light oil can actually be incredibly beneficial.
Not only should the oil you use vary depending on your hair type, but how you actually perform the treatment should alter slightly too. Find out how often to use hot oil, and how long you should be leaving it in
Haircare brands are innovating their treatment lines and other products all the time. New technologies allow for quick-fire developments in maintaining healthy hair. Hair glosses, which condition, colour, and add shine to the hair, are one of the more recent creations.
Whatever your hair concern, we can help you find the perfect treatment and tell you exactly how to use it. Your haircare routine shouldn't stop at shampoo and conditioner. Have a read and get on your way to healthier, more beautiful hair!
Subscribe to:
Comments (Atom)
What is yoga?
Yoga is a holistic and ancient practice that originated in India thousands of years ago. It encompasses a wide range of physical, mental, ...

-
 Just as makeup is all about blending skin tones and artificial shades that suit you and compliment you in a natural looking way, so is ...
 -
 1. Round Face You have a round face when the vertical to horizontal ratio is equal. The majority of your features are soft and rounded...